Google has over 200 criteria for SEO ranking for websites, and one of the most important ones is your website speed, i.e., the speed at which your web pages load. If it is slow, Google will start ranking your website lower; plus, slow loading speed also increases your website’s bounce rate, which dramatically affects your SEO ranking further.
So, what’s the solution for this? There are many ways you can improve your site performance, but one of the most effective ones is optimising your images for the website. No, we are not asking you to upload low-resolution images to your website; you need to simply compress your images to optimise them. Here’s a detailed guide on everything you need to know about image optimization and nine of the best image compression tools you can use.
What Does It Mean to Optimise Images?
Before we proceed, you must understand what it means to optimise your images. When you upload large images to your website, it slows down the site’s load speed because now, the web page has to download a larger photo every time your user visits the web page. By optimising your images, all you are doing is decreasing the image’s file size so that it can load faster, improving the web interface.

Why Do We Need Image Compression?
Image compression has many benefits beyond just the website load speed. The first benefit, as mentioned above, is that your site becomes faster to load. According to HTTP Archive, for an average website, 21% of the total weight is taken up by image file. This is why compressing images is usually the first step in optimising WordPress sites.
Thanks to picture optimization, faster loading speeds will lead to lower bounce rates and better SEO rankings.
The next benefit of image optimization is that it lowers your website’s overall size, making it much easier to create backups. An unoptimised site would take ten hours to create a backup, and an optimised website can take as low as three or four hours for the same process.
Smaller photo size also translates to your website using less bandwidth. The user’s network and browser can then quickly load your website without exerting too much processing power, which will further improve your website performance.
With optimised image file, you can save up to 20% to 25% of storage space on your server. With this extra space, you can easily expand your website or save money on server storage.
While the primary goal of optimising your website images should be to improve user experience and gain SEO points, the benefits go far beyond just that.

How to Optimise Images for Web and Performance
Optimising your images isn’t as simple as reducing the resolution of the image. Sure, lowering the resolution will decrease the image file size, but it will also significant quality loss. Instead, you need to find the right balance between the smallest file size and acceptable quality.
There are a few ways to compress image files. One of the most common ways of doing so is compressing the images before uploading them to your WordPress website. This can be done with various software like Adobe Photoshop or Affinity Photo. You can also use WordPress plugins to compress pictures while uploading to your website.
When compressing the image files, you need to consider the file type and compression type. You need to choose the right combination of compression type and file format; doing so can help you decrease the photo size by as much as five times!
Here’s how you can start optimising your images for web performance.

Which is the Right File Format?
Before you start your photo optimization process, you need to choose the right file type. Here are three of the best file types you can choose from:
- PNG: PNG produces higher quality images, but the downside is that it has a larger file size.
- JPEG: JPEG files is another popular image file format, which can be both lossy and lossless, and it allows you to adjust the quality level of the image for a good balance between quality and file size.
- GIF: GIF uses 256 colours, and it is the best option for animated images, but it also only uses lossless compression.
There are other formats you can use, too, like JPEG XR and WebP, but do note that these formats may not be supported by all web browsers. We suggest you stick to JPG and JPEG files for images with vivid colours and PNG for simple images.
Does Image Resizing Reduce Quality?
When compressing images, you are essentially trying to reduce the image’s size without compromising the quality too much. This happens by adjusting the compression rate. While adjusting the compression rate, you need to ensure that you don’t compress it too much, which will make the picture quality very low. Similarly, not compressing enough may not affect the quality at all, but it won’t reduce the image file size significantly. You need to find the right balance with the compression rate.
So, to answer the question, yes, image optimization can reduce the image quality if you compress the image too much. But there’s more to image resizing than just that, explained below.

What are the Two Types of Image Compression?
When compressing images, you can choose from two types of image compression—lossy or lossless compression—depending on your image size and preferences.
Lossy Compression, which is a filter that eliminates some of the data from the photo and degrades the image. You should use lossy compression apps if you have a picture that can do well with a significant loss of resolution because lossy compression can eliminate a large amount of the image size.
On the other hand, if you want to maintain the image quality, you should use lossless compression. With lossless compression, the data is compressed, but the image quality is not affected.
We recommend you experiment with both the compression types and see which one works best for you.

What Are Some Free Picture Compression Tools?
Now that you know what image compression really is and how it can benefit your website let’s move on to the best free image compression tool you can use for your WordPress website.
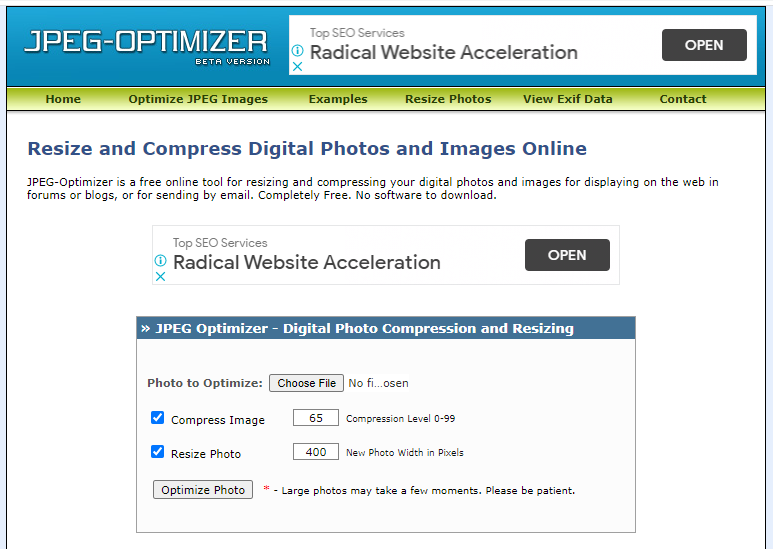
1.JPEG Optimizer
The first tool on the list is JPEG Optimizer. This tool lets you compress images online, and it is a simple tool that works as it should. The best thing about this tool is that it lets you resize images before you optimise, which will save you a lot of loading time. Plus, it lets you select your own optimization levels and control the image quality, which is a vital feature if you want to hit the sweet spot between saving space and preserving quality.
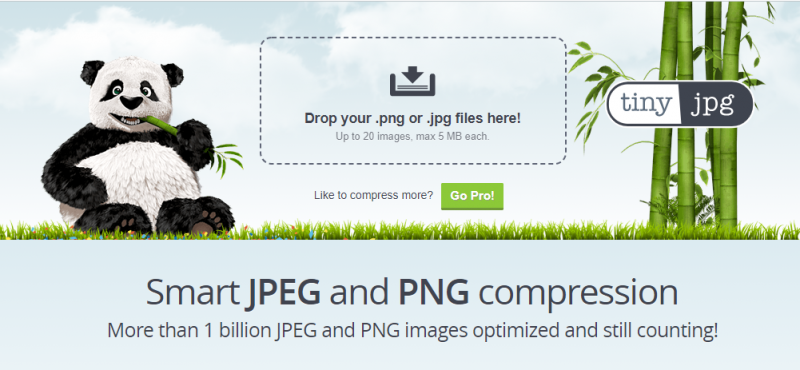
2.Tiny PNG
One of the oldest and most popular image resizing tools is Tiny PNG, which comes with a ton of possibilities and features for image optimization. This online took works well for JPG, JPEG and PNG file and lets you upload up to 20 images in one go, which is limited to 100 images per month. If your file is too large, this might not be the right tool for you as it has an upload limit of 5 MB. You can also integrate a Tiny PNG plugin into your WordPress website.

3.Optimizilla
One of the best online image optimizer tools to produce excellent quality image resizing with the smallest file size possible is Optmizilla, which can compress JPG, JPEG and PNG images. This tool comes with a slider feature that you can use you see the before and after versions of your image. You can upload up to 20 images in one go, making it an excellent image optimizer tool for batch processing.
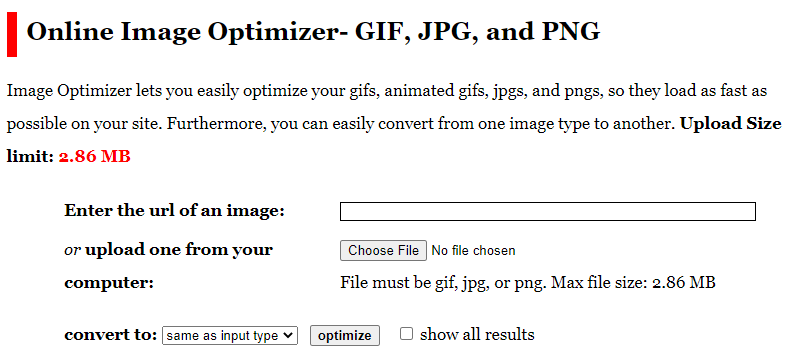
4.Online Image Optimizer
Online Image Optimizer is an image compression app developed by Dynamic Drive, and it lets you optimise your images in all major image types with ease. It can also help you turn your JPEG images into PNG files. Plus, you can upload images here using URL, so you can optimise images that are already on your website without having to waste time downloading them and uploading them for the process. The only downside is that you can only upload one image at a time with a maximum file size of 2.86 MB, which can significantly limit this tool’s scope of use, especially if you use PNG files.
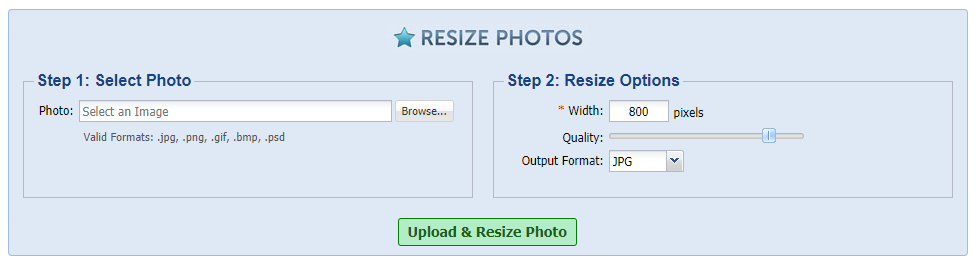
5.Resize Photos
Another popular yet simple image optimization tool Resize Photos. On this tool, you simply upload your images to the online page, set the compression level (from 1 to 100), and then download the optimised image. The tool website also allows you to apply image effects, including captions, filters, borders, shadows, reflections, rounded corners, etc.
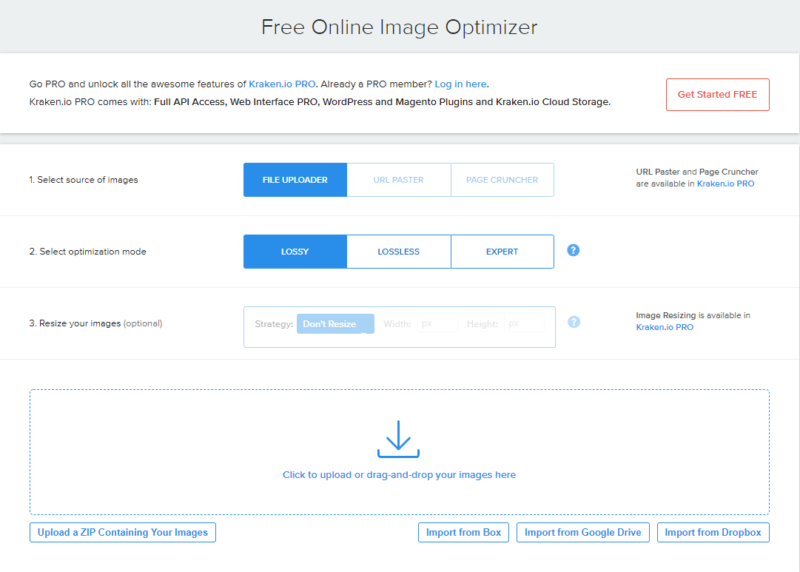
6. Kraken.io
One of the best bulk image optimizers in the market right now is Kraken.io, which lets you optimise bulk files of GIF, PNG, JPG, and JPEG files. This tool optimises your images for the smallest sizes, so you will always get the smallest file size version of the image that you process. The tool also lets you export the bulk images post-process as .zip files or straight to Dropbox or Google Drive.
There is also a pro version of the online image optimizer tool, which lets you input multiple images sources at once with no limit on upload size. Meanwhile, the free version only allows you to compress photos up to 32 MB and up to a total of 100 MB photos.
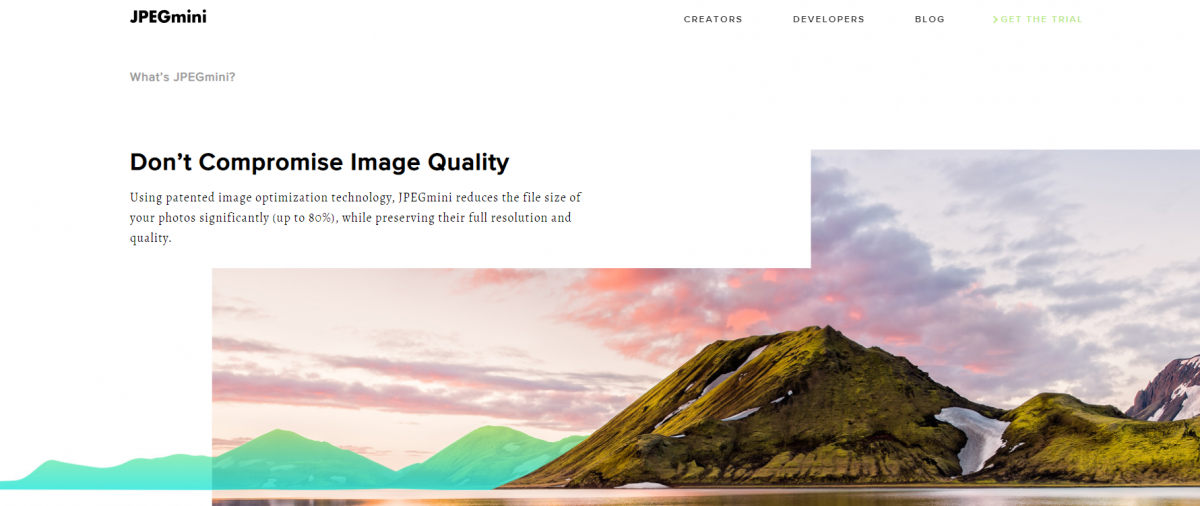
7.JPEGmini
If you appreciate an exemplary user interface and design with your image resizing tool, look no further than JPEGmini. This online tool is easy to use and has a better interface than most other image compression tools online. The best part about this online image optimizer tool is that it is also relatively quick with processing.
JPEGmini is free to use and comes with a Pro version, and it has a sleek slider feature to view before and after images. Many users appreciate this image optimizer tool because it also does not harm the image’s quality as much as some other free online image optimization tools tend to do.
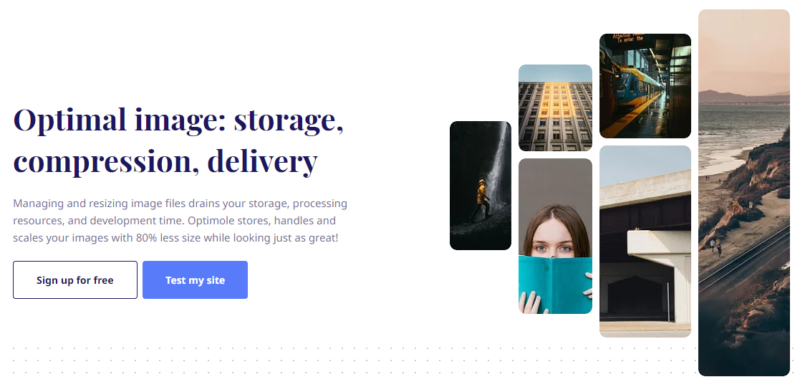
8.Optimole
Another free online image file optimization tool that is quite popular in the WordPress circle is Optimole, which also comes as a WordPress plugin. It is made by the same developer that made ThemeIsle. Using this tool, you can compress and resize JPEG and PNG images, and you can also lazy load and host your images on their CDN. Do note that the SAAS features are not free to use, but otherwise, this is a brilliant tool to optimise your images quickly and for free.
9.FileOptimizer
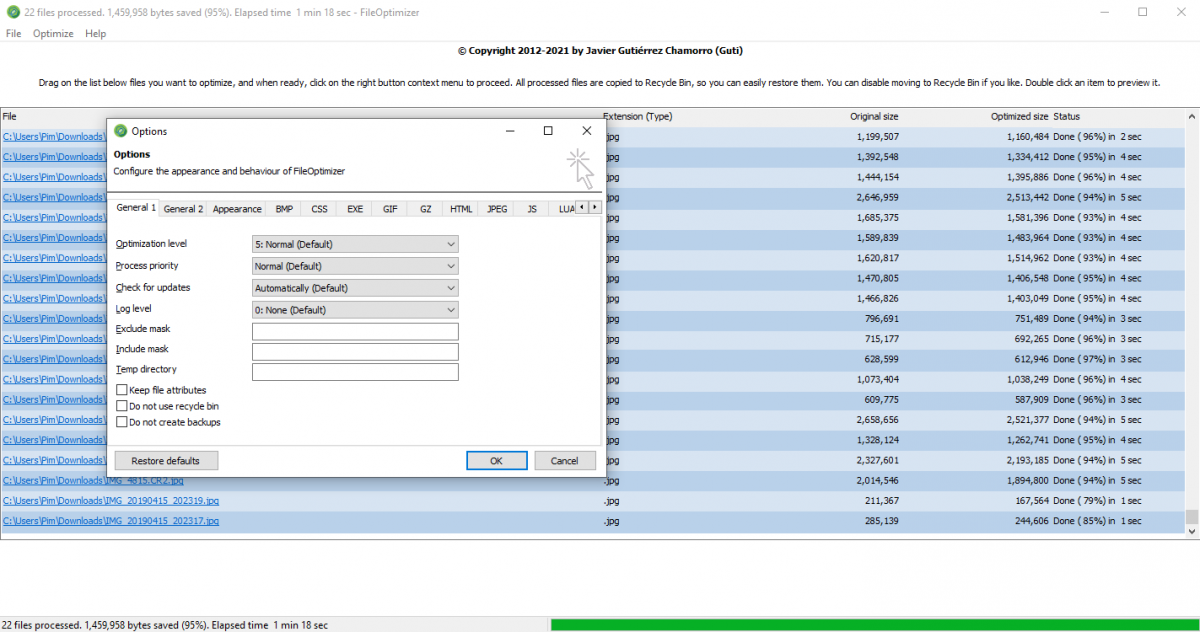
FileOptimizer is a lossless file size optimiser supporting .3G2, .3GG, .3GP, .7Z, .A, .AAI, .AC, .ACC, .ADP, .AI, .AIR, .APK, .APNG, .APPX, .APR, .ART, .ART, .AVI, .AVS, .BAR, .BMP, .BPG, .BPL, .BSZ, .CBT, .CBZ, .CDR, .CDT, .CHI, .CHM, .CHQ, .CHS, .CHW, .CIN, .CMYK, .CMYKA, .CPL, .CSL, .CSS, .CUR, .DB, .DB, .DCX, .DDS, .DEB, .DES, .DIB, .DLL, .DOC, .DOCM, .DOCX, .DOT, .DOTM, .DOTX, .DPX, .DRV, .DWF, .DWFX, .EAR, .EASM, .EML, .EMLX, .EPDF, .EPDF, .EPRT, .EPUB, .EXE, .FAX, .FAX, .FB2, .FDF, .FITS, .FLA, .FLAC, .FLV, .FPX, .FPX, .FXG, .FXG, .GALLERY, .GALLERYCOLLECTION, .GALLERYITEM, .GFT, .GIF, .GRAY, .GRS, .GZ, .HDR, .HRZ, .HTM, .HTML, .ICB, .ICL, .ICO, .ICO, .INK, .INLINE, .IPA, .IPK, .IPSW, .ITA, .ITS, .ITZ, .J2C, .J2K, .JAR, .JFI, .JFIF, .JIF, .JNG, .JP2, .JPC, .JPE, .JPEG, .JPG, .JPS, .JPT, .JS, .JSON, .KML, .KMZ, .KMZ, .KSF, .LIB, .LIT, .LUA, .LUAC, .LXF, .LZL, .LZMA, .M4A, .M4B, .M4P, .M4R, .M4V, .MAX, .MBX, .MCE, .MDB, .MDT, .MDZ, .MHT, .MHT, .MHTML, .MHTML, .MIC, .MIF, .MIFF, .MIX, .MIZ, .MK3D, .MKA, .MKS, .MKV, .MMIP, .MNG, .MONO, .MOV, .MP3, .MP4, .MPC, .MPD, .MPEG, .MPG, .MPO, .MPP, .MPP, .MPR, .MPT, .MSC, .MSG, .MSG, .MSI, .MSL, .MSP, .MST, .MSZ, .MTV, .MTW, .MVG, .MVZ, .MZZ, .NAR, .NBK, .NOTEBOOK, .O, .OBJ, .OCX, .ODB, .ODF, .ODG, .ODP, .ODS, .ODT, .OEX, .OGA, .OGG, .OGG, .OGV, .OGX, .OGX, .OLE, .OLE2, .ONE, .OPT, .ORA, .OSK, .OST, .OTB, .OXPS, .P7, .PALM, .PBM, .PCC, .PCD, .PCDS, .PCL, .PCLS, .PCX, .PDB, .PDF, .PFM, .PFS, .PGM, .PIC, .PICON, .PICT, .PK3, .PNG, .PNM, .PNS, .POTM, .POTX, .PPAM, .PPM, .PPS, .PPSM, .PPSX, .PPT, .PPTM, .PPTX, .PSB, .PSD, .PTIF, .PTIF, .PTIFF, .PTIFF, .PUB, .PUB, .PUZ, .QT, .QWK, .R2SKIN, .RA, .RAM, .RDB, .RDB, .RFA, .RFG, .RFT, .RGB, .RGBA, .RLL, .RM, .RMSKIN, .RMVB, .RTE, .RV, .RVT, .S3Z, .SCR, .SGI, .SGML, .SLDASM, .SLDDRW, .SLDM, .SLDPRT, .SLDX, .SMIL, .SOU, .SPL, .SPO, .SQLITE, .SQLITE2, .SQLITE3, .STZ, .SUN, .SVG, .SVGZ, .SWC, .SWF, .SYS, .TAR, .TGA, .TGZ, .THM, .TIF, .TIFF, .UYVY, .VBX, .VCARD, .VCF, .VDA, .VDX, .VICAR, .VIFF, .VLT, .VOB, .VSD, .VSS, .VST, .VST, .VSX, .VTX, .WAL, .WAR, .WAV, .WBA, .WBMP, .WEBA, .WEBM, .WEBP, .WIZ, .WMA, .WMV, .WMZ, .WPS, .WSZ, .X, .XAP, .XBM, .XHTML, .XHTML, .XL, .XLA, .XLAM, .XLC, .XLM, .XLS, .XLSB, .XLSM, .XLSX, .XLTM, .XLTX, .XLW, .XML, .XML, .XMZ, .XNK, .XPI, .XPM, .XPS, .XSF, .XSL, .XSLT, .XSN, .XWD, .YCBR, .YCBRA, .YUB, .Z01, .Z02, .Z03, .Z04, .Z05, .Z06, .Z07, .Z08, .Z09, .Z10, .ZIP, .ZIPX, .ZX01, .ZX02, .ZX03, .ZX04, .ZX05, .ZX05, .ZX06, .ZX07, .ZX08, .ZX09, .ZX10, STICKYNOTES.SNT and THUMBS.DB file formats among many others.
Thanks to FileOptimizer’s optimisation and recompression techniques, this tool helps to compress image and video files without changing file format.
Are There Any Protips for Optimising Images?
Using these tools, you can optimise your images with ease and improve your website experience and performance. However, to get the best results, follow these best practices for your website’s image file optimization process.
- If you are using a WordPress plugin, make sure that the plugin compresses and optimises your images externally on its own server, which will reduce the load on your website servers.
- We recommend using CDN to serve images to your users fast across the globe.
- Remember to clear your image file data and cache regularly, so you don’t overload your server space with irrelevant and obsolete images.
- Always process your images in the correct dimensions, even if your WordPress theme supports responsive images.
- Instead of placing text within your images, use web fonts, which look much better when scaled and don’t take up too much space.
- It is best to use lossy compression wherever possible.
- If you need an animation, use GIF images; if you need high detail and resolution, use PNG; stick to JPEG or JPG for general images.
- Remove any unnecessary metadata from the images.
Using these tools and techniques of image optimization, you can make your website up to 20% faster and save a lot more space on your servers. This will translate to a better user experience and web interface and a much higher SEO ranking. Of course, this is just one step in the overall SEO optimization process, so stay tuned to know more on how you can rank your websites higher with better SEO techniques.